PDF Preparation for MGCF Poster Printing
I have a PDF or other format file. Is it okay for printing?
We want a PDF (not a Powerpoint, Illustrator, or any other type document). The PDF must be the desired poster print size (not 8.5x11 inches).
Once you make a PDF, open it with Acrobat. Go to File/Properties and check the document size. Is it 8.5x11 or is it poster size?
If it is poster size, we recommend you view it at 100% and then again at a "Fit to Page" size and look for errors.
Conversion to PDF mimics the print process and sometimes layout shifts can occur when converting from Powerpoint (or other non WYSISYG software). The only way to see this is to carefully proofread the PDF. Adjust accordingly in the original and try again. It can take a few tries to get the PDF the way you want it.
If your PDF is poster sized and is otherwise okay, it is ready to email to us.
If you need to adjust the scale a small amount, here are some
instructions for changing PDF scaling on a Mac.
A similar process should work on Windows.
If your PDF is 8.5x11 or other small size, try the steps outlined below:
I am just starting a poster. Where do I begin?
To make a poster, open a blank slide in Powerpoint or artboard in Illustrator. Under File, Page Setup
(or related menu option) set the size to the final desired poster size. Then add your data, etc
to the slide.
If you already have a slide with the wrong size, make a new blank one with the correct size,
then copy/paste from old to new, and rearrange the contents.
My Powerpoint is ready, how do I make a poster sized PDF?
"Save As" PDF from new versions of Powerpoint often works fine, assuming your slide was
poster sized. Try this first and review
as described above.
"Save As" PDF from old versions of Powerpoint often results in an 8.5x11 PDF. This is not acceptible for a poster print.
If your PDF is not at poster size, start by verifying your slide dimensions are correct with Powerpoint, File, Page Setup. If your slide has the wrong size, make a new blank one with the correct size, then copy/past from old to new, and rearrage the contents. Otherwise, if your Powerpoint is old, or you just don't have time to fix the slide, you can try to "print" to a PDF where you set the PDF "paper size" to be the desired size your poster. This varies by Powerpoint version but usually on the Print menu popup window, there will be a Page Setup where you can set a custom size. This can often let you scale up from the slide size to a larger PDF size. But note that the aspect ratio has to be constant. For example, if your slide has a 4:3 width:height ratio for example, you can try to make a 40x30inch poster, but not 40x40.
How do I print to a PDF?
Windows:
If you have an ancient version of Powerpoint or other unusual setup, you may need
a PDF writer.
We recommend (free)
CutePDF Writer.
You will need 2 executables:
CuteWriter
and a ps2pdf converter such as
GNU Ghostscript.
Download both, install Ghostscript first, then install the CuteWriter.
These basically
install as a Printer and should work with newer Powerpoint versions too.
1. Print to PDF.
In Powerpoint, select File/Print (not Save As) and then select CutePDF writer from the printer list.
Select Properties from the Print Dialog Box. Then select Advanced. At this point, you are
setting the "paper size" for your PDF. Find the Paper Size option and choose "Postscript Custom Page Size".
Then specify the width and height to be the same or 2 inches larger than your Powerpoint slide
dimensions (add 2 inches if you want a white space around the edges). Usually you must specify the smaller number
first at this step. For example, if your poster is either 36x48 or 48x36, set the "Postscript Custom Page Size"
to be 36x48.
To clarify the treatment of landscape Powerpoint files, our experience has shown that the width must always be smaller than the height in the "Postscript Custom Page Size" step even if your actual Powerpoint slide is landscape. It is not usually necessary to make any further landscape/portrait adjustments. The software normally does that for you. 300dpi is the recommended resolution. For "True Type Font" select "Download as Softfont".
If you are using gradient transparent fills in your Powerpoint document, please read this page to make sure your PDF handles this correctly. In the print menu: Settings - Full Page Slides - High Quality. Click OK in each dialog to get you back to the main Print dialog, and click OK. After a little while the PDF writer will prompt you for a filename.
Note: in certain cases the above method results in horizontal lines in the PDF document. If this happens to you, try following the steps listed above (set the paper size in the PPT print dialog) but instead of clicking OK to print it, click "Print Preview" then close the preview. This saves the paper size setting but does not print it. Now you can select "Save As" and and save it in the PDF format and a poster of the correct size will result.
2. Inspect the PDF.
Once the PDF is ready, use a PDF reader to verify it is okay.
From Adobe, select File/Properties to see the PDF size.
Is it 8.5x11 or poster sized?
Then view the file using "Fit to Page". Check for cropping near the edges, for example the height or width is cut off. In that case you could try to remake the PDF after swapping the width and height settings in the "Postscript Custom Page Size".
Other problems can be resolved by adding 1 or 2 more inches to each dimension. For example, your Powerpoint document is 36 x 43. When you print to PDF, you could set the custom page size to 38x45. If you add margins at the PDF step, make sure you do not "Scale to Fit Page" since this will scale your poster up and mess up the margins.
Then view the PDF at 100% size and check it carefully. Sometimes layout shifts when converting to PDF. These shifts can occur when text and object boxes are too large or small for the text or objects they contain. Images scale with fixed aspect ratio whereas fonts typically do not so the relative positions of fonts/images can shift. Adjust accordingly in the original document and try again. It can take a few tries to get the PDF the way you want it.
Mac:
1. Print to PDF.
To prepare a PDF from Powerpoint on a Mac, select File/Page Setup. Your
Powerpoint slide is probably sized as Custom and reflects the desired poster size. Now you need to
define the "paper size" for your PDF. To do this, Click Options on the Page Setup window.
A new window (confusingly also labelled Page Setup) will open. On this new window, use the
Paper Size pulldown to look for a paper size that matches your desired poster size AND
has the smaller dimension defined first. You probably wont find one and instead
will have to choose "Manage Custom Page Sizes" at the bottom of the Paper Size pulldown.
Then in the Custom Page Sizes window, define a new paper size where you specify the width and height
to match your desired poster size but always specify the smaller number first.
For example, if your poster is either 36x48 or 48x36, set the Custom Page Size to be 36x48. To clarify the treatment of landscape Powerpoint files, our experience has shown that the width must always be smaller than the height in the Custom Page Size step even if your actual Powerpoint slide is landscape. It is not usually necessary to make any further landscape/portrait adjustments. The software normally does that for you in the PDF preparation.
Once you have defined your Custom Page Size, Click OK to go back one step. Now make sure your newly defined Custom Page Size is actually selected in the Paper Size pulldown! We find it is usually not selected even though it was just defined. Usually you have to actively select it. Once you have the Paper Size pulldown set to the desired Custom Page Size, click OK, then click OK again to exit the original Page Setup.
Now select File/Print. ***Note, the preview at this step is not always accurate.**** Don't worry. This PDF is usually going to be okay. Select the PDF pulldown near the lower left of the Print window and choose "Save as PDF".
2. Inspect the PDF. See the instructions under Windows.
Miscellaneous
MARGINS and FIT: The printer required margins of about 0.25 inches along the short axis of the paper roll. The real printable dimensions on that axis is about 41.5 inches on 42 inch paper. Parts of your poster may be cut off if your margins exceed the printable area. We usually notice and will scale to fit without comment but you can let us know if you prefer us to scale to fit or crop.
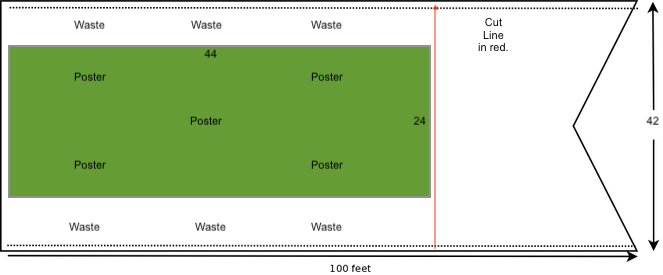
In the example below, the poster is 48x42 and you might think it would fit on the 42" paper resulting in a paper usage of 42x48 total. But this fails to account for print margins. Note that the text and images go right to the edge on the 42" dimension and would be cropped if printed on the 42" paper. We would probably scale this down a few percent at the print step to prevent cropping.
 If your poster is 44x50, it would have to be scaled down to fit on the paper to make a roughly 42x48 inch poster.
If your poster have dimensions that are 44x24, consider how this would fit on the paper. If would either have to be scaled down to fit 42x23, which is the cheaper option, or it would be printed where we align the 24 inch side with the 42 inch axis .
IMAGES: These should be of at least 300dpi. For instance, if you wish to print an image 4 inches wide, the pixel (picture element or dot) width should be at least 4x300 or 1200 pixels.
BERKELEY LOGOS AND CAMPUS IMAGES: Can be found here. Follow the Downloads link.
FONTS: Make sure you embed all fonts. Usually this is an option in the Page Setup or Print menu as you create your PDF. It is often a box labelled "Always Download needed fonts". Make sure this is checked.
POWERPOINT TIPS AND TEMPLATES: It is easy to find poster templates and there is also a Better Posters Blog with many fine tips.
For ACS poster sessions, the display board in recent years is 6 feet wide and 4 feet high (= up to a 72x48 inch poster)
in hotels with 8 feet wide and 4 feet high in the main convention center. However, 6 feet wide and 4 feet high is starting to
seem more common in all spaces.
Unfortunately, the ACS guidelines link keeps changing but check what is current before starting your poster. Consider 6 feet wide by 3.5 high
as a maximum reasonable size that we could print and would be workable for you too.